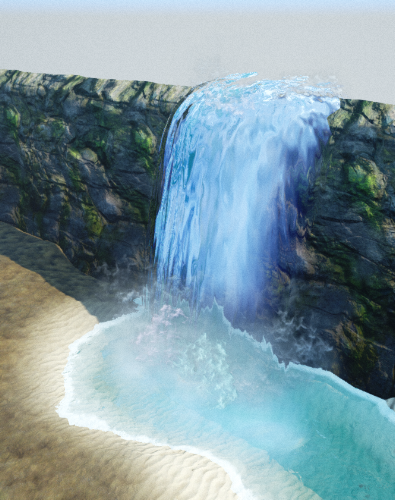
Revamping the Waterfall
Hello! In this post we'll go through the process of re-vamping a waterfall mesh and its materials in Unreal blueprint.
The images below show the original waterfall in game, without materials, and with material in the mesh editor.
The main issues that needed to be fixed were the hard edges around the waterfall, and although not very noticeable on the picture, the waterfall moved erratically back and forth (in an attempt to break up the edge of the waterfall) instead of falling straight down from gravity.
The mesh of the waterfall itself was also combined with the mesh of the waterfall pool, which would need to be fixed.
So! Taking the original mesh back into Maya, I remodeled a slightly higher poly version of both the waterfall and the waterfall pool. For the waterfall pool, instead of making it a complete circle, I modeled it with a curve so that it would fit directly with the waterfall without intersecting it (which could cause hard edges to show).
The next step is to fix the hard-edges issue, which can be solved with vertex painting. By vertex painting the edges of the meshes, that vertex colour value can be used/masked in the material editor and (in this case) manipulated to control the opacity for the desired effect.
In this mesh, the red vertex paint is what will be masked for very little opacity, whilst the black vertex paint will remain opaque.
In this mesh the reverse will happen. The red vertex paint will be opaque whilst the black edges will lose opacity.
Within the material editor, this is where the vertex colour is used:
The red vertex colour (this is for the waterfall mesh) is masked to be influenced by the opacity value of the depth fade node. The node is then connected to the opacity in the result node of the material. A parameter (waterDepth) is also used to control the fade distance and intensity of the opacity level.
From here on it's simply a case of editing the material editor to create the desired effect. Tessellation values were greatly lowered to reduce the erratic movement of the waterfall. The waterDepth value was edited, and a very small metallic value (0.05) was added. The original panning texture was edited as well as the base colours of the waterfall. Below was the final material editor (most of the original material was able to remain the same):
Here was the final result (without particles):
Now the final result with particles!
Thanks for reading! Until next time.
For more of my work visit http://eflusin.wix.com/portfolio


